Basic of fleet by Heliot
Fleet by Heliot provides real-time vehicle tracking services to help you manage your work conveniently, quickly, anytime, anywhere, and also help reduce the problem of corruption. In addition, prevent accidental damage by setting alerts for various hazardous events.
After logging in, there will be the following menus:
Related Topics
Car location
Fleet by Heliot used maps from Google Map for the precision of location and details that always update to present. This menu display location of each vehicle including of status in real-time. You can search for the vehicle you want to track by typing the vehicle registration plate or car name.
Status of vehicle separated by 4 statuses as
Green is the car moving.
Orange is the car parked with the engine on.
Red is the car parked with the engine off.
Grey is lost the connection
Filter by vehicle statuses
You can filter by status with press each status button and you can choose more thane 1 status.
Example of the filter by Green and Orange status.
Trip
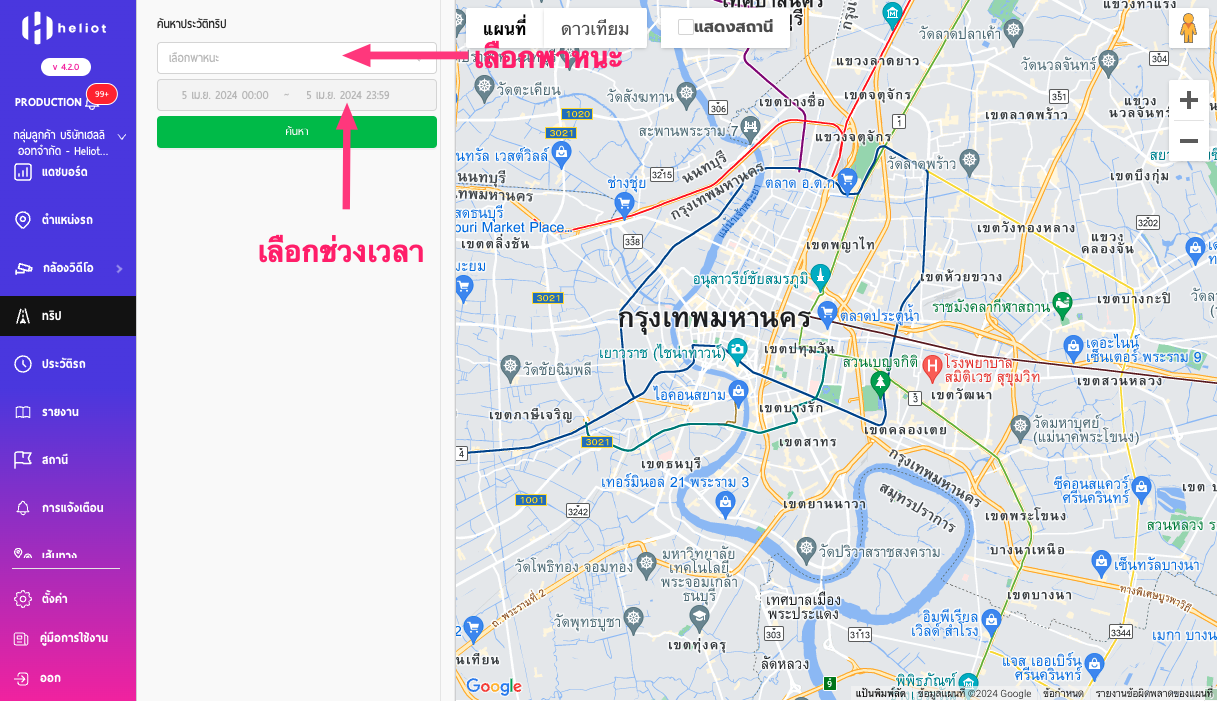
Display trip information for each vehicle with the duration date you want.
How to check trip
- Choose vehicle
- Pick your duration date
- Press search button
- Display every trip in duration date
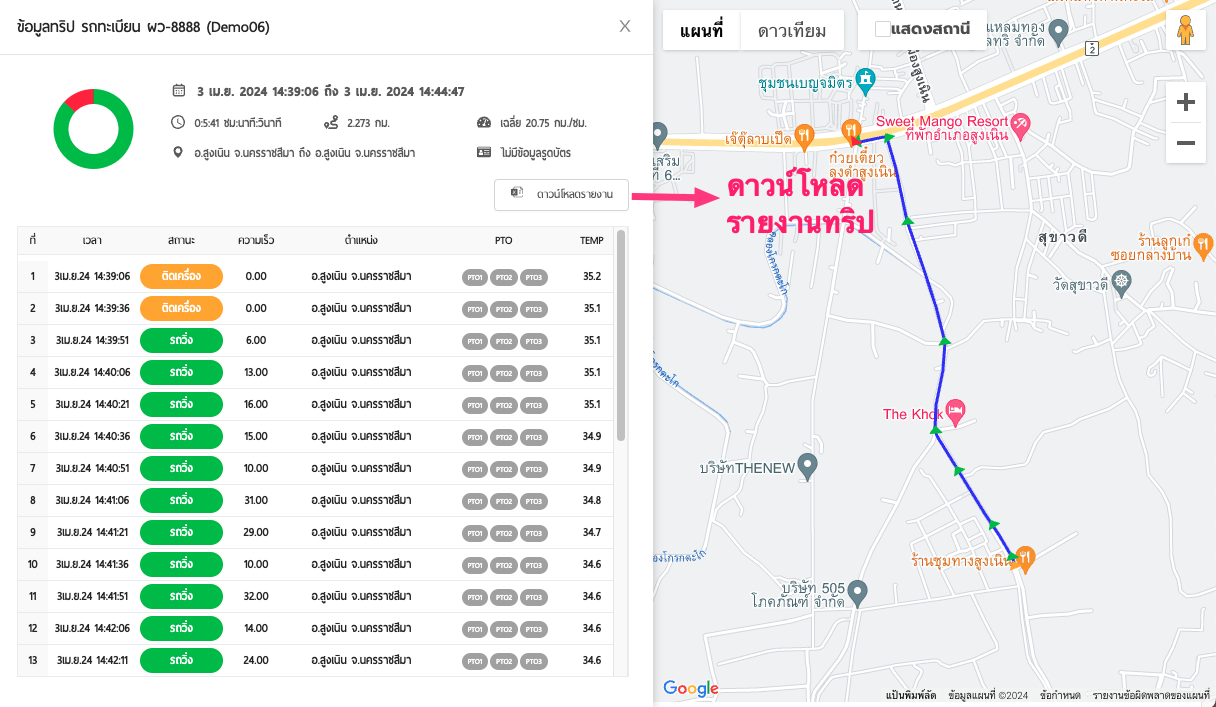
- Check each trip by pressing the trip you want to.
6. When selecting a trip, the status of the car will be displayed the speed at each point. Information from accessory devices, such as temperature or oil gauges, and the vehicle’s direction. You can also download reports of each trip as well.
Car History
Display vehicle history with duration date, which shows the details of vehicle status each period. Including status from accessory devices such as PTO, temperature, fuel used, and also checking each location from google map as well.
How to check car history
- Select vehicle
- Pick a duration date
- Select on-off information display
- route report table
- route history on the map
- press search button
- Display trip history as the picture below
- Map will show all directions from trip history with duration and you can choose on/off direction and station.
- information table display information for each vehicle (date, time, speed, location, link to google map, PTO, temperature, and distance)
Report
You can create and download reports from this page. These include reports on driver performance and behavior, fuel consumption, driving safety data reports, etc.
How to download report
- Select report you want to
- Select period
- Select vehicle group
- Select vehicles (You can select more than 1)
- Some reports may be fields to select additional conditions, such as temperature reports conditions will be added data frequency, speed reports will add a condition for the number of minutes driving over the speed limit, etc.
- Download (Excel file)
Type of reports
- Daily Report: Displays the total distance data in the specified period, the total number of times for each status, the duration of each status, the cumulative number of kilometers, distance (km), starting position, and ending position of each status.
- Trip Report: Displays total distance data for a specified period, data for each trip (duration, cumulative km., starting position, ending position, driver, maximum speed, average speed, starting point temperature, ending point temperature. )
- Fuel Report: Displays the amount of fuel measured at each point.
- Temperature Report: Displays maximum temperature, minimum temperature, average temperature, and temperature for each location.
- Speed Report: Display Overspeed information (distance, duration, and acceleration).
- Vehicle Location Report: Displays Latitude – Longitude data for each period, car status, temperature, PTO, GSM, satellite signal, speed, position, cumulative km, car battery, fuel, and other information displayed on the location page. (depending on the installation of accessories)
- Fuel Graph: Displays daily fuel consumption graphs, based on vehicle status. This fuel graph can help you observe abnormalities in the amount of fuel. In the case of oil corruption.
- Temperature graph: Displays temperature graph values for each time period. Users can download graph images to be used in reports.
- Speed graph: Displays a graph of vehicle speed for each time period.

- PTO Report: Displays On/Off PTO for each period.
- Idling Report: Displays the information of the engine being parked for a long time according to the conditions and the position where the car is in that state.
- Station to Station Report: Travel report from station to station by telling the distance, the time it takes to travel, the time to enter the first station, and the time to leave the destination station.
- Summary Report: Displays summary of all events, e.g. vehicle stops, overtime, ignition off/on, total mileage, total reporting time, etc.
Station
You can create a station for identifying locations such as storage or drop-off point.

The station can create in 3 ways:
- Polygon: drag the point and trace to shape the location you want

- Circle: make a circle area on the map with your desired location.

- Customize circle: Type a latitude and longitude of a location, then set the distance of the circle (meter).
Notification
Notification management system, there are event notify and maintenance notify.

Event Notification
- No update is There are no responce between gps device and server more than 20 minutes
- Temperature is to set the range of temperature you want.
- Speed is to set notification when overspeed.
Station is To notify when vehicle arrive to each station.
Maintenance Notification
- Mileage is a notification based on the mileage each vehicle.
- Working hour is a notification based on the working hours of auxiliary equipment such as PTO crane, PTO air conditioner.
- Date is a notification by date. Often used to notify about car insurance renewals, or insurance renewals, etc.

Route
Specify the route for your driver, adding a drop-off point, or another destination. This feature can help you optimize the best route which will save you cost and time.

- Adding route
- Select the way to add station; latitude/longitude, location, vehicle, and station.
- Typing location as the way you chose. For e.g. select the vehicle then select the car with the registration plate
- Pressing the plus symbolic (+) on the right-hand side to add the destination.
- After adding a destination, you can press optimized to get the best route but they may not be sorted by the location you added.
- At last display the route.

Optimized is the system will arrange the destinations and choose the most time-saving route for you. They might not be in the order you originally added them
Milk run is Round trip
- Route information: Display all of the route information such as total distance from start point to destination, length of time from start point to destination, etc. If you want to save the route for your next time use, you can name the route and save it. In another way, you can share the route by open with Google Maps.

TMS
Task management system helps end customers and business owners manage their tasks for every single vehicle, track job status, geofence enter-exit, and build or analyze reports for summary in a day.
- All task is default page of the TMS section. You also can view only today’s task by clicking on today’s task button.
- Add task, this menu will show you a form with the information about the new task. Next on the right side is a part of the filter, you can add conditions such as start date, end date, and driver’s name. In addition, you can sort the list of tasks by clicking date sorting or filter by the status of the task; prepare to deliver, deliver, delivered, upload (a photo of each task), and cancel delivery.
- You can download the report of each driver by selecting the start date, end date, and driver’s name then choose the file type for download.
- You can search the task at the search bar as a task’s name, driver’s name, etc.
- The information is displayed in a table for easy understanding. Starting from the date, station, and pictures uploaded by the driver. (Number shows the number of station locations to stop at Green means the driver has successfully uploaded the image, gray means the image has not been uploaded yet, red means the task has been canceled), task status, task edit button, and a link to send the task to the driver.

- Add task and Example
The process of adding tasks is as follows:
- Press the button “Add task”
- Display add task form
- Fill information in to form
- Task date
- Task name
- Reference number
- Type of vehicles
- Vehicle registration plate
- Door number DC
- Beginning task status
- Driver1
- Driver2 (In case of more than 1 driver)
- Note
- Troll way price
- Fuel price
- Trip price
- Drop off station; fill in the number of stations, and space and followed by the station name. If there is more than 1 station, you can type more on the next line. (The station must be a station that has already been created on the station page only.)
- Save

- Driver (TMS)
This page shows the stations that have to submit all the driver’s work in a day, showing the task name, vehicle registration number, reference number, door, and task photo upload button, task done button.

Setting
Settings on the location page and on/off notification. You can choose to display vehicle information on the location page.

- In case of closing all position displays (PTO connection, temperature, fuel level, driver data), as the picture below shows only the vehicle name/registration plate, position, speed, and vehicle status, which is the basic information only.

- In the case of turning on only the fuel level.

- In the case of turning on only temperature.


